upload a file from url into a string java
Tutorials / Server Tutorials / Uploading Files
Uploading Files
tutorial coffee server file-upload
- HTML
- Restricting Files
- File Hosting
- AWS S3
- Homework
At present we know how to become user input using HTML forms, and nosotros know how to store that data in a database. We can and then use that information to return HTML from a servlet or JSP file.
But so far, all of our user input has been text-based. We've seen stuff like text fields, text areas, dropdown boxes, and checkboxes. Only we oasis't seen file uploads yet.
That's because file uploading requires slightly more complicated code than handling basic text input. This tutorial goes through what we demand to do to handle file uploads.
HTML
Allow's outset with what the user interacts with: beginning, we have to create an HTML form that contains a file input.
<!DOCTYPE html> <html> <head> <championship>File Upload Example</title> </head> <torso> <form action= "/upload" method= "Postal service" enctype= "multipart/form-information" > <p>What's your name?</p> <input type= "text" proper noun= "proper noun" value= "Ada" > <p>What file exercise you want to upload?</p> <input type= "file" name= "fileToUpload" > <br/><br/> <input blazon= "submit" value= "Submit" > </class> </body> </html> This HTML folio contains a class. Notice the enctype="multipart/class-data" attribute and the <input type="file" name="fileToUpload"> element. This allows a user to select a file for uploading. This won't do anything yet, becuase we haven't created the server part yet! Allow's do that at present:
import java.io.File ; import java.io.IOException ; import coffee.io.InputStream ; import java.nio.file.Files ; import java.nio.file.StandardCopyOption ; import javax.servlet.ServletException ; import javax.servlet.http.HttpServlet ; import javax.servlet.http.HttpServletRequest ; import javax.servlet.http.HttpServletResponse ; import javax.servlet.http.Function ; public class FileUploadServlet extends HttpServlet { @Override public void doPost ( HttpServletRequest request , HttpServletResponse response ) throws IOException , ServletException { //get the file chosen by the user Part filePart = request . getPart ( "fileToUpload" ); //get the InputStream to store the file somewhere InputStream fileInputStream = filePart . getInputStream (); //for example, y'all can copy the uploaded file to the server //note that you probably don't want to do this in real life! //upload it to a file host like S3 or GCS instead File fileToSave = new File ( "WebContent/uploaded-files/" + filePart . getSubmittedFileName ()); Files . copy ( fileInputStream , fileToSave . toPath (), StandardCopyOption . REPLACE_EXISTING ); //get the URL of the uploaded file Cord fileUrl = "http://localhost:8080/uploaded-files/" + filePart . getSubmittedFileName (); //You can get other grade data too String proper name = request . getParameter ( "name" ); //create output HTML that uses the response . getOutputStream (). println ( "<p>Thank you " + name + "! Here's a link to your uploaded file:</p>" ); response . getOutputStream (). println ( "<p><a href=\"" + fileUrl + "\">" + fileUrl + "</a></p>" ); response . getOutputStream (). println ( "<p>Upload another file <a href=\"http://localhost:8080/index.html\">hither</a>.</p>" ); } } This servlet class contains the doPost() that will fire when the HTML course is submitted. First it gets the uploaded file in a Part object, and then gets an InputStream from that Part. From here we could use the InputStream to store the file wherever we wanted, but for at present we just store information technology to the WebContent/uploaded-files folder, inside our web app directory. That stores the file under the WebContent directory, which means we tin employ a URL to point to the file! The code uses that fact to output HTML that contains a link to the file that was just uploaded.
Finally, we demand a spider web.xml file that maps the /upload URL to this servlet:
<spider web-app xmlns= "http://xmlns.jcp.org/xml/ns/javaee" xmlns:xsi= "http://www.w3.org/2001/XMLSchema-example" xsi:schemaLocation= "http://xmlns.jcp.org/xml/ns/javaee http://xmlns.jcp.org/xml/ns/javaee/web-app_3_1.xsd" version= "3.ane" > <servlet> <servlet-proper name>FileUploadServlet</servlet-proper noun> <servlet-course>FileUploadServlet</servlet-class> <multipart-config /> </servlet> <servlet-mapping> <servlet-proper noun>FileUploadServlet</servlet-name> <url-pattern>/upload</url-pattern> </servlet-mapping> </web-app> The only new thing here is the <multipart-config /> tag. This enables the default configuration for file uploads, but y'all can also utilise this to customize stuff like maximum file size and whether uploaded files are stored in memory or in a temporary file.
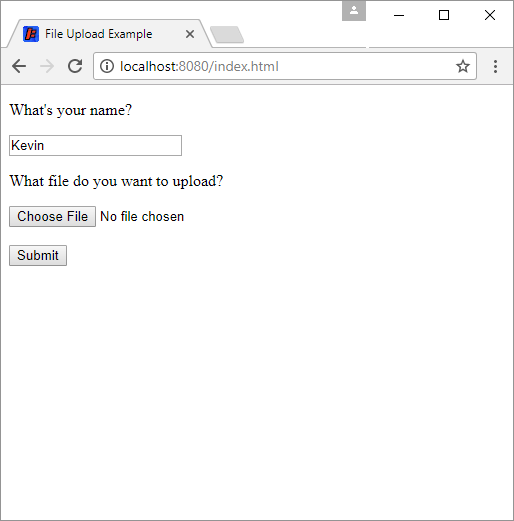
Run this spider web app and navigate to http://localhost:8080/index.html to see our upload folio:
Then click the Choose File push button to open up a dialog that allows you to select a file from your hard drive, and so click the Submit button to upload that file to the server. You should then see a link to the file in your server:
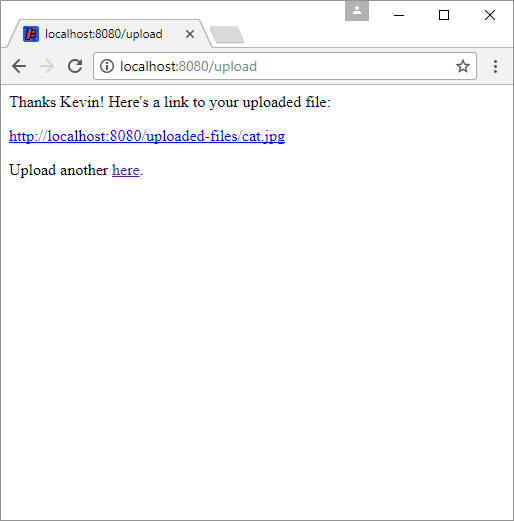
Depending on the blazon of file your uploaded, clicking the link volition either display the contents of the file in the browser, or download the file. You can also right-click the link to download it, just similar any other link to a file on the cyberspace.
Restricting Files
One mutual affair you'll probably desire to do is restrict what types of files a user tin upload. For example, mayhap you only want users to upload epitome files, but not .zip or .exe files.
Y'all tin use the accept attribute on the HTML form to merely allow images (more info on that approach here), but like nosotros discussed before, hackers tin can easily get around client-side restrictions, so we have to do some server-side validation anyway.
Here's a simple modification to our servlet class that only allows users to upload files that end with .jpg or .png:
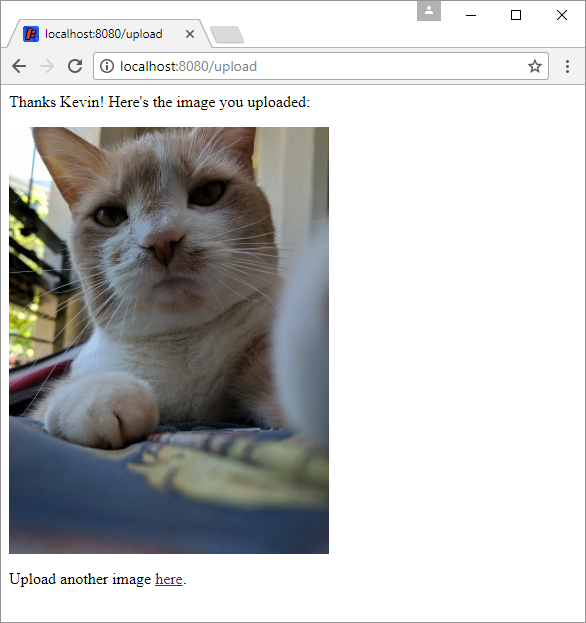
import java.io.File ; import coffee.io.IOException ; import coffee.io.InputStream ; import java.nio.file.Files ; import java.nio.file.StandardCopyOption ; import javax.servlet.ServletException ; import javax.servlet.http.HttpServlet ; import javax.servlet.http.HttpServletRequest ; import javax.servlet.http.HttpServletResponse ; import javax.servlet.http.Office ; public class FileUploadServlet extends HttpServlet { @Override public void doPost ( HttpServletRequest request , HttpServletResponse response ) throws IOException , ServletException { //get the file chosen by the user Part filePart = asking . getPart ( "fileToUpload" ); if ( filePart . getSubmittedFileName (). endsWith ( ".jpg" ) || filePart . getSubmittedFileName (). endsWith ( ".png" )){ InputStream fileInputStream = filePart . getInputStream (); File fileToSave = new File ( "WebContent/uploaded-files/" + filePart . getSubmittedFileName ()); Files . copy ( fileInputStream , fileToSave . toPath (), StandardCopyOption . REPLACE_EXISTING ); Cord fileUrl = "http://localhost:8080/uploaded-files/" + filePart . getSubmittedFileName (); Cord name = request . getParameter ( "name" ); response . getOutputStream (). println ( "<p>Thanks " + proper noun + "! Here's the epitome y'all uploaded:</p>" ); response . getOutputStream (). println ( "<img src=\"" + fileUrl + "\" />" ); response . getOutputStream (). println ( "<p>Upload some other paradigm <a href=\"http://localhost:8080/index.html\">hither</a>.</p>" ); } else { //the file was not a JPG or PNG response . getOutputStream (). println ( "<p>Please merely upload JPG or PNG files.</p>" ); response . getOutputStream (). println ( "<p>Upload another file <a href=\"http://localhost:8080/index.html\">here</a>.</p>" ); } } } This code now checks whether the original name of the file concluded with .jpg or .png, and if so, it goes through with the upload and creates HTML that contains an <img> tag that points to the URL of the uploaded image file:
If the user tries to upload a file that ends with something other than .jpg or .png, then they get an fault.
Annotation that this simply checks the filename of the file, not its bodily content. So we're still not stopping a user from, for example, creating a .txt file, renaming it to be a .jpg file, and then uploading that. If nosotros want to forbid cases similar that, then we take to examine the contents of the uploaded file to brand sure it contains an allowed blazon. Come across hither for a discussion on this approach, simply basically: detect a library that does this for yous!
File Hosting
The above examples shop the uploaded file direct in the server directory, which is a bad idea for a few reasons. First, all of the files will exist deleted whenever we make a alter to our lawmaking and redeploy the server. And if we're using a server host like Elastic Beanstalk or App Engine, we might non even be immune to store files on our server, which are usually supposed to be as lightweight equally possible.
Instead of storing the files on the server or in the web app directory, in existent life nosotros probably desire to utilise a file hosting provider. Using a file hosting provider allows u.s.a. to store all of our files separately from the server running our lawmaking. When the user uploads a file, we get that file in memory on our server, and we then upload it to the file host. The file host then gives us a URL for the file that we tin use in our HTML.
Note that information technology's also possible to shop your files directly in a database, but that's generally non a peachy idea. Instead, the general arroyo is to store the file itself in a file hosting provider, so shop the URL of that file in a database.
AWS S3
Amazon Elementary Storage Service (aka AWS S3) is a file hosting service offered past Amazon. It lets yous store your files in Amazon'southward cloud, and it offers a Java library that makes uploading to S3 pretty easy.
Step one: Create an S3 saucepan.
S3 uses the idea of buckets, which are a fiddling bit like directories. You tin organize your files into dissimilar buckets, and buckets can comprise subdirectories that then incorporate files. Login to the AWS S3 console and and then click the Create bucket button. Give your bucket whatever name you lot want (I'chiliad calling mine my-uploaded-files for now.)
Click the Side by side button twice to set the permissions on the bucket. Under Manage public permissions, select Grant public read access to this bucket. Yous'll get a alert proverb that this will let everyone to view the files in this saucepan, and that's exactly what we desire! Annotation that you lot can also use S3 to create a individual bucket for storing private files, but for now we're but going to create a public saucepan that anybody on the cyberspace can view. That way we tin use URLs that bespeak to these files!
Click Next again and so click Create bucket to create your bucket.
Footstep 2: Get your AWS credentials.
To collaborate with our S3 bucket through code, we demand to become some credentials so we tin prove it's the states uploading files to our bucket. There are a bunch of ways to do this, but I'll walk through the simplest arroyo here. You might want to come up back to this later and read through your options and implement something a picayune fleck more complicated, merely for now allow's just get something that works.
From the S3 console, click your proper name in the upper-correct corner, and so click My Security Credentials. Click the Access Keys department, so click the Create New Admission Fundamental button. In the dialog that pops up, click the Show Access Primal link. This displays an Admission Cardinal ID and a Secret Access Cardinal, which is basically a username and password for your AWS business relationship. Copy these downward, because yous'll demand them in a minute!
Step iii: Download the AWS S3 Java library.
We need this so we tin can write Java code that uploads files to our AWS S3 bucket. Go to the AWS Java SDK page and so click the AWS SDK for Java button in the Downloads department in the upper-right of this page. That downloads a .zip file, which y'all can unzip anywhere. (I'll put mine on my desktop for now.)
This directory contains a aws-java-sdk.jar file in the lib binder, and a agglomeration of other .jar files in the third_party folder.
Pace four: Copy those library jars into the lib folder of your web app directory.
The aws-java-sdk.jar file contains the main AWS Java library. But that library was built using a agglomeration of other libraries, and so nosotros need to re-create them from the third_party folder. For the lawmaking nosotros're going to write, we need these .jar files:
-
aws-java-sdk.jar -
commons-logging.jar -
httpclient.jar -
httpcore.jar -
jackson-annotations.jar -
jackson-core.jar -
jackson-databind.jar -
joda-time.jar
If you're using Eclipse, you'll also want to add them to your project'south build path. If you're using the command line, you'll take to add together them to your classpath argument.
Step 5: Write code that uploads a file to S3.
At present that we have those library .jar files, we can write code using the classes in them. These classes allow usa to write code that uploads a file to S3. Here's what our servlet form looks like using S3:
import java.io.IOException ; import java.io.InputStream ; import javax.servlet.ServletException ; import javax.servlet.http.HttpServlet ; import javax.servlet.http.HttpServletRequest ; import javax.servlet.http.HttpServletResponse ; import javax.servlet.http.Office ; import com.amazonaws.auth.AWSStaticCredentialsProvider ; import com.amazonaws.auth.BasicAWSCredentials ; import com.amazonaws.services.s3.AmazonS3 ; import com.amazonaws.services.s3.AmazonS3ClientBuilder ; import com.amazonaws.services.s3.model.CannedAccessControlList ; import com.amazonaws.services.s3.model.ObjectMetadata ; import com.amazonaws.services.s3.model.PutObjectRequest ; public class FileUploadServlet extends HttpServlet { @Override public void doPost ( HttpServletRequest asking , HttpServletResponse response ) throws IOException , ServletException { //get the file chosen by the user Office filePart = request . getPart ( "fileToUpload" ); String fileName = filePart . getSubmittedFileName (); if ( fileName . endsWith ( ".jpg" ) || fileName . endsWith ( ".png" )){ InputStream fileInputStream = filePart . getInputStream (); Cord accessKeyId = "YOUR_ACCESS_KEY_ID" ; String secretAccessKey = "YOUR_SECRET_ACCESS_KEY" ; String region = "YOUR_BUCKET REGION" ; String bucketName = "YOUR_BUCKET_NAME" ; String subdirectory = "images/" ; //AWS Admission Key ID and Secret Access Key BasicAWSCredentials awsCreds = new BasicAWSCredentials ( accessKeyId , secretAccessKey ); //This course connects to AWS S3 for us AmazonS3 s3client = AmazonS3ClientBuilder . standard (). withRegion ( region ) . withCredentials ( new AWSStaticCredentialsProvider ( awsCreds )). build (); //Specify the file'southward size ObjectMetadata metadata = new ObjectMetadata (); metadata . setContentLength ( filePart . getSize ()); //Create the upload asking, giving it a bucket name, subdirectory, filename, input stream, and metadata PutObjectRequest uploadRequest = new PutObjectRequest ( bucketName , subdirectory + fileName , fileInputStream , metadata ); //Make information technology public so we tin can use information technology as a public URL on the net uploadRequest . setCannedAcl ( CannedAccessControlList . PublicRead ); //Upload the file. This tin take a while for big files! s3client . putObject ( uploadRequest ); //Create a URL using the bucket, subdirectory, and file name Cord fileUrl = "http://s3.amazonaws.com/" + bucketName + "/" + subdirectory + "/" + fileName ; //We can still get other information from the form String proper noun = request . getParameter ( "name" ); response . getOutputStream (). println ( "<p>Thanks " + name + "! Here'due south the epitome yous uploaded:</p>" ); response . getOutputStream (). println ( "<img src=\"" + fileUrl + "\" />" ); response . getOutputStream (). println ( "<p>Upload another image <a href=\"http://localhost:8080/index.html\">hither</a>.</p>" ); } else { //the file was not a JPG or PNG response . getOutputStream (). println ( "<p>Please but upload JPG or PNG files.</p>" ); response . getOutputStream (). println ( "<p>Upload another file <a href=\"http://localhost:8080/alphabetize.html\">here</a>.</p>" ); } } } This code uploads a file to our S3 saucepan, and then creates a URL that points to the file we just uploaded. We can employ that URL in our HTML, or we could store it in a database. Merely note that we're no longer storing the file on our server! Try running this web app, uploading a file, then viewing your bucket in the S3 console. You'll meet the file has been uploaded to your bucket.
This shows the nuts of S3, but in that location are a ton of other things you can do. Here are a couple things worth checking out:
- Notation that you should never salvage your credentials into a public repository! Instead, you lot can use a properties file to store your credentials, then load that properties file from the code. As long as you lot don't store the properties file in your repo, y'all're okay. More info here.
- Uploads of large files tin can take a long fourth dimension. You can get progress info and bear witness something similar a progress bar while the file uploads.
- You tin can employ a custom URL for your S3 bucket past pointing a subdomain of your own domain (for instance,
s3.example.com) to your bucket'southward URL.
This tutorial is meant to bear witness you lot the nuts. Y'all now know plenty to start your own investigating! Check out the AWS Java SDK programmer guide for a ton more info.
Homework
- Add the ability to upload contour pictures to your spider web app.
Comments and Questions
Happy Coding is a community of folks just similar you lot learning about coding.
Do you have a annotate or question? Mail service it here!
Source: https://happycoding.io/tutorials/java-server/uploading-files
0 Response to "upload a file from url into a string java"
Post a Comment